Hello Sahabat Anak Kendali.
Tulisan kali ini akan menjelaskan tentang Cara Mengakses Sensor Cahaya, beserta rangkaianya
kali ini saya akan mencoba untuk mengakses sensor cahaya dengan Atmega16 menggunakan CVAVR
dan hasil nilai sensornya akan ditampilkan pada LCD 16 x 2
untuk mengakses lcd 16 x 2 dengan CVAVR silahkan baca di Mengakses LCD 16 x 2 dengan CVAVR
baca juga tentang mengakses Sensor jarak ultrasonic
langsung saja, sobat bisa membuat sendiri rangkaian sensor cahaya seperti gambar dibawah ini
sensor cahaya ini biasa digunakan pada robot mobil line follower, tapi bisa digunakan untuk sensor pendeteksi kekeruhan air, atau yang lainya,
langsung saja, yang harus kita lakukan adalah membuka software CVAVR dan Khazama AVR kemudian pada CVAVR kita akan membuat program dengan bantuan codewizard untuk mengaktifkan fungsi ADC dan LCD
dan berikut adalah program yang saya buat,
/*****************************************************
This program was produced by the
CodeWizardAVR V2.05.3 Standard
Automatic Program Generator
© Copyright 1998-2011 Pavel Haiduc, HP InfoTech s.r.l.
http://www.hpinfotech.com
Project :
Version :
Date : 1/6/2018
Author : Chaerul Anam
Company : Sixty Light
Comments:
Chip type : ATmega16
Program type : Application
AVR Core Clock frequency: 16.000000 MHz
Memory model : Small
External RAM size : 0
Data Stack size : 256
*****************************************************/
#include <mega16.h>
#include <stdlib.h>
#include <delay.h>
// Alphanumeric LCD functions
#include <alcd.h>
#define ADC_VREF_TYPE 0x40
// Read the AD conversion result
unsigned int read_adc(unsigned char adc_input)
{
ADMUX=adc_input | (ADC_VREF_TYPE & 0xff);
// Delay needed for the stabilization of the ADC input voltage
delay_us(10);
// Start the AD conversion
ADCSRA|=0x40;
// Wait for the AD conversion to complete
while ((ADCSRA & 0x10)==0);
ADCSRA|=0x10;
return ADCW;
}
// Declare your global variables here
char buff[10];
void main(void)
{
// Declare your local variables here
// Input/Output Ports initialization
// Port A initialization
// Func7=In Func6=In Func5=In Func4=In Func3=In Func2=In Func1=In Func0=In
// State7=T State6=T State5=T State4=T State3=T State2=T State1=T State0=T
PORTA=0x00;
DDRA=0x00;
// Port B initialization
// Func7=In Func6=In Func5=In Func4=In Func3=In Func2=In Func1=In Func0=In
// State7=T State6=T State5=T State4=T State3=T State2=T State1=T State0=T
PORTB=0x00;
DDRB=0x00;
// Port C initialization
// Func7=In Func6=In Func5=In Func4=In Func3=In Func2=In Func1=In Func0=In
// State7=T State6=T State5=T State4=T State3=T State2=T State1=T State0=T
PORTC=0x00;
DDRC=0x00;
// Port D initialization
// Func7=In Func6=In Func5=In Func4=In Func3=In Func2=In Func1=In Func0=In
// State7=T State6=T State5=T State4=T State3=T State2=T State1=T State0=T
PORTD=0x00;
DDRD=0x00;
// Timer/Counter 0 initialization
// Clock source: System Clock
// Clock value: Timer 0 Stopped
// Mode: Normal top=0xFF
// OC0 output: Disconnected
TCCR0=0x00;
TCNT0=0x00;
OCR0=0x00;
// Timer/Counter 1 initialization
// Clock source: System Clock
// Clock value: Timer1 Stopped
// Mode: Normal top=0xFFFF
// OC1A output: Discon.
// OC1B output: Discon.
// Noise Canceler: Off
// Input Capture on Falling Edge
// Timer1 Overflow Interrupt: Off
// Input Capture Interrupt: Off
// Compare A Match Interrupt: Off
// Compare B Match Interrupt: Off
TCCR1A=0x00;
TCCR1B=0x00;
TCNT1H=0x00;
TCNT1L=0x00;
ICR1H=0x00;
ICR1L=0x00;
OCR1AH=0x00;
OCR1AL=0x00;
OCR1BH=0x00;
OCR1BL=0x00;
// Timer/Counter 2 initialization
// Clock source: System Clock
// Clock value: Timer2 Stopped
// Mode: Normal top=0xFF
// OC2 output: Disconnected
ASSR=0x00;
TCCR2=0x00;
TCNT2=0x00;
OCR2=0x00;
// External Interrupt(s) initialization
// INT0: Off
// INT1: Off
// INT2: Off
MCUCR=0x00;
MCUCSR=0x00;
// Timer(s)/Counter(s) Interrupt(s) initialization
TIMSK=0x00;
// USART initialization
// USART disabled
UCSRB=0x00;
// Analog Comparator initialization
// Analog Comparator: Off
// Analog Comparator Input Capture by Timer/Counter 1: Off
ACSR=0x80;
SFIOR=0x00;
// ADC initialization
// ADC Clock frequency: 1000.000 kHz
// ADC Voltage Reference: AVCC pin
// ADC Auto Trigger Source: ADC Stopped
ADMUX=ADC_VREF_TYPE & 0xff;
ADCSRA=0x84;
// SPI initialization
// SPI disabled
SPCR=0x00;
// TWI initialization
// TWI disabled
TWCR=0x00;
// Alphanumeric LCD initialization
// Connections are specified in the
// Project|Configure|C Compiler|Libraries|Alphanumeric LCD menu:
// RS – PORTD Bit 0
// RD – PORTD Bit 1
// EN – PORTD Bit 2
// D4 – PORTD Bit 4
// D5 – PORTD Bit 5
// D6 – PORTD Bit 6
// D7 – PORTD Bit 7
// Characters/line: 16
lcd_init(16);
while (1)
{
// Place your code here
int sensor = read_adc(0);
lcd_clear();
lcd_gotoxy(0,0);
lcd_putsf(“Kendali Elektro”);
itoa(sensor, buff);
lcd_gotoxy(0, 1);
lcd_putsf(“ValSensor: “);
lcd_gotoxy(11,1);
lcd_puts(buff);
delay_ms(1000);
}
}
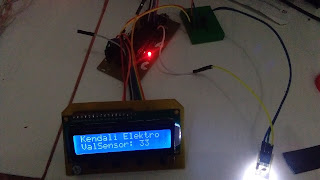
hasilnya kurang lebih seperti pada gambar ini
kemudian jika agan ingin mendownload project yang saya buat silahkan download DISINI!
password : www.kendali-elektro.xyz
mungkin cukup sekian apa yang bisa saya tulis kali ini, semoga bermanfaat bagi kita semua, silahkan beri masukan, kritikan, saran, ataupun pertanyaan dikolom komentar !
keyword:
Mengakses sensor cahaya cvavr
photodiode cvavr
cvavr atmega
atmega anak kendali
anak kendali cvavr
phototransistor cvavr

