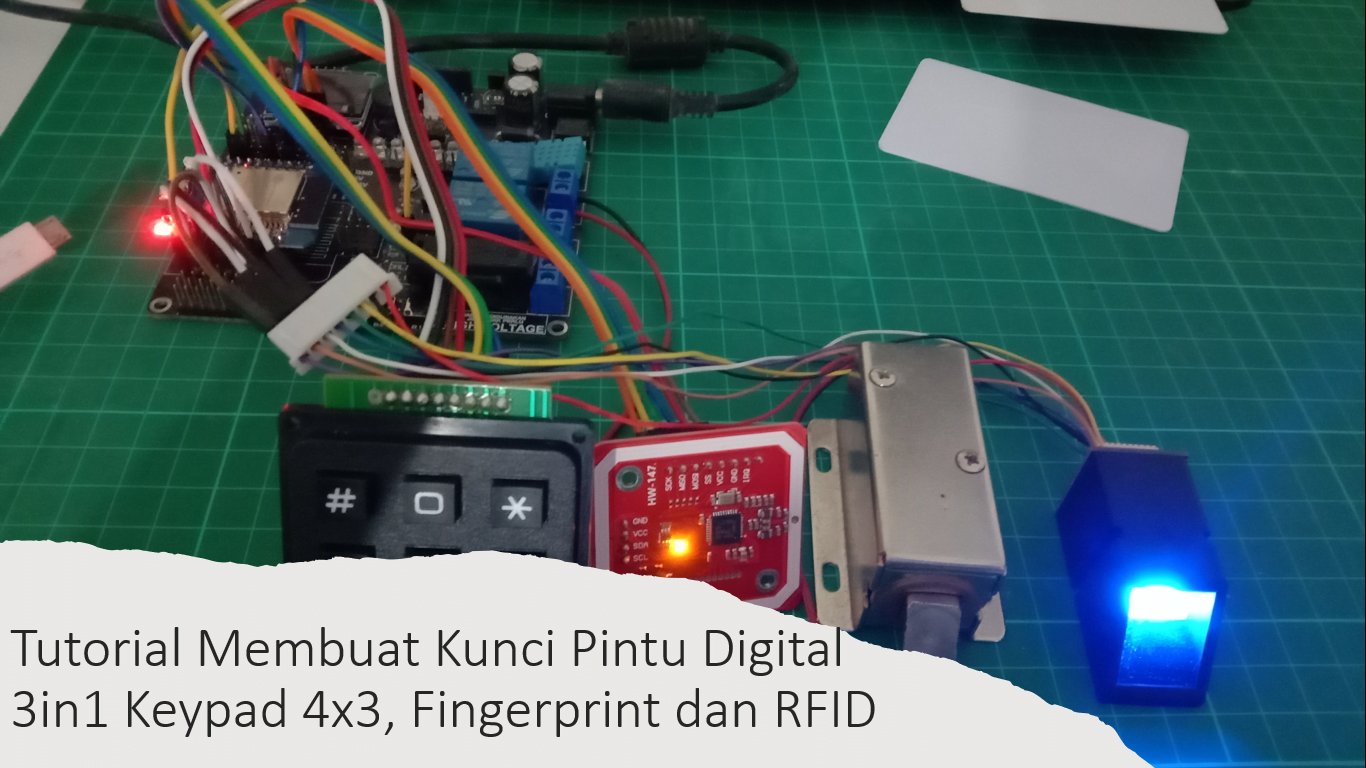
Digital door lock or digital door lock is a project that is in great demand by many people, and this time I will make a digital door lock that is accessed with three types of ESP32 sensors, 4×3 Keypad, Fingerprint and RFID PN532.
The solenoid door lock that I use is a digital lock module on the market for 40 thousand rupiahs, while for the driver I use a 5V DC relay module which is equipped with an optocoupler to convert 3.3V to 5V. https://youtu.be/k5RjZfjHwgc
The PN532 RFID module is an rfid module which in my opinion is better than the RC522, for some reasons I prefer to use PN532. However, if you want to use the RC522 for digital door locks, of course you can.
The function of the RFID module is to open or access the solenoid digital door lock using a registered ID card.
Fingerprint sensor or fingerprint is a sensor that can detect fingerprints. with a price of around 150 thousand rupiah you can already buy this fingerprint module.
Fingerprint function to access solenoid door lock based on id stored in fingerprint memory.
4×3 keypad are buttons arranged in a matrix to produce 4 rows and 3 columns.
4×3 keypad function to access digital lock solenoid based on pin or password.
The digital lock or door lock tutorial with keypad and rfid can be read here ESP32 Door Lock Tutorial with 4 × 3 Keypad PIN
ESP8266 Tutorial Accessing INA219 Sensor with Door Lock Load
Arduino Tutorial to Make Digital Lock with Keypad and Servo
NodeMCU ESP8266 Relay Tutorial RFID RC522 Door Lock
Purchase the component at Tokopedia.com

Code Digital Lock or Digital Door Lock 3in1 Arduino IDE
#include <Adafruit_Fingerprint.h>
Adafruit_Fingerprint finger = Adafruit_Fingerprint(&Serial2);
#include <Keypad.h>
#include <SPI.h>
#include <Adafruit_PN532.h>

#define PN532_SCK  (18)
#define PN532_MISO (19)
#define PN532_MOSI (23)
#define PN532_SS   (27)
Adafruit_PN532 nfc(PN532_SCK, PN532_MISO, PN532_MOSI, PN532_SS);

const byte ROWS = 4; //four rows
const byte COLS = 3; //four columns
char hexaKeys[ROWS][COLS] = {
  {'1', '2', '3'},
  {'4', '5', '6'},
  {'7', '8', '9'},
  {'*', '0', '#'}
};

byte rowPins[ROWS] = {13, 26, 14, 12}; //connect to the row pinouts of the keypad
byte colPins[COLS] = {5, 25, 33}; //connect to the column pinouts of the keypad

Keypad customKeypad = Keypad( makeKeymap(hexaKeys), rowPins, colPins, ROWS, COLS);

#define doorlock 15

uint8_t id;

volatile int interruptCounter;
int totalInterruptCounter;

hw_timer_t * timer = NULL;
portMUX_TYPE timerMux = portMUX_INITIALIZER_UNLOCKED;

void IRAM_ATTR onTimer() {
  portENTER_CRITICAL_ISR(&timerMux);
  interruptCounter++;
  portEXIT_CRITICAL_ISR(&timerMux);

}

TaskHandle_t Task1;
TaskHandle_t Task2;

void setup() {
  // put your setup code here, to run once:
  Serial.begin(9600);
  nfc.begin();
  uint32_t versiondata = nfc.getFirmwareVersion();
  if (! versiondata) {
    Serial.print("Didn't find PN53x board");
    while (1); // halt
  }
  nfc.SAMConfig();

  finger.begin(57600);

  if (finger.verifyPassword()) {
    Serial.println("Found fingerprint sensor!");
  } else {
    Serial.println("Did not find fingerprint sensor :(");
    while (1) {
      delay(1);
    }
  }
  pinMode (doorlock, OUTPUT);
  digitalWrite(doorlock, 1);

  xTaskCreatePinnedToCore(
                    Task1code,   /* Task function. */
                    "Task1",     /* name of task. */
                    10000,       /* Stack size of task */
                    NULL,        /* parameter of the task */
                    1,           /* priority of the task */
                    &Task1,      /* Task handle to keep track of created task */
                    0);          /* pin task to core 0 */
  delay(500);

  //create a task that will be executed in the Task2code() function, with priority 1 and executed on core 1
  xTaskCreatePinnedToCore(
                    Task2code,   /* Task function. */
                    "Task2",     /* name of task. */
                    10000,       /* Stack size of task */
                    NULL,        /* parameter of the task */
                    1,           /* priority of the task */
                    &Task2,      /* Task handle to keep track of created task */
                    1);          /* pin task to core 1 */
    delay(500);

}

int state = 0;
String StringVal, idcard;
String idterdaftar = "e5156c23";
unsigned long oldtime = 0;
void loop() {
  // put your main code here, to run repeatedly:

}

void Task1code( void * pvParameters ){
  Serial.print("Task1 running on core ");
  Serial.println(xPortGetCoreID());

  for(;;){
    read_kartu();
  }
}

void Task2code( void * pvParameters ){
  Serial.print("Task2 running on core ");
  Serial.println(xPortGetCoreID());

  for(;;){
    read_key();
  }
}

int getFingerprintIDez() {
  uint8_t p = finger.getImage();
  if (p != FINGERPRINT_OK)  return -1;

  p = finger.image2Tz();
  if (p != FINGERPRINT_OK)  return -1;

  p = finger.fingerFastSearch();
  if (p != FINGERPRINT_OK)  return -1;

  // found a match!
  Serial.println(finger.fingerID);
  state = finger.fingerID;
  return finger.fingerID;
}

void read_kartu() {
  bool success;
  uint8_t uid[] = { 0, 0, 0, 0, 0, 0, 0 };  // Buffer to store the returned UID
  uint8_t uidLength;

  success = nfc.readPassiveTargetID(PN532_MIFARE_ISO14443A, uid, &uidLength, 10);
  if (success) {
    // Display some basic information about the card
    idcard = "";
    for (byte i = 0; i <= uidLength - 1; i++) {
      idcard += (uid[i] < 0x10 ? "0" : "") +
                String(uid[i], HEX);
    }
    Serial.print("ID Kartu Anda : ");
    Serial.print(idcard);
    Serial.println("");

    if (idcard == idterdaftar) {
      state = 1;
    }
    else {
      state = 0;
    }
  }
  delay(1000);
}

void read_key() {
  char Key = customKeypad.getKey();
  if (Key) {
    if (Key >= '0' && Key <= '9') {
      StringVal += Key;
      Serial.println(StringVal);
    }
    else if (Key == '#') {
      if (StringVal.length() > 0) {
        if (StringVal == "1412") {
          state = 1;
        }
        StringVal = "";
      }
    }
    else if (Key == '*') {
      StringVal = "";
    }
  }
}
The code above uses ESP32 which utilizes dual cores.
Why am I using dual core?
Because the code keypad and RFID cannot be combined, so I tried activating the dual core on the ESP32.
That’s the tutorial that I shared about the 3in1 RFID digital lock print and also the 4×3 keypad as input pin or password.
Keyword
- digital lock esp32,
- arduino digital lock code,
- digital door lock project,
- digital door lock fingerprint project,
- rfid digital door lock project,
- digital door lock keypad,
- arduino digital door lock,