Hello sahabat Anak Kendali.
pada kesempatan kali ini saya akan menuliskan artikel tentang Tutorial STM32, Cara Mengakses Button LED, STM32Cube dan Keil uVision.
jika kamu belum membaca Tutorial sebelumnya silahkan baca terlebih dahulu Tutorial STM32, Memulai Program dengan STM32Cube dan Keil uVision dan juga Tutorial STM32, Memulai Program dengan Arduino IDE.

jika sudah membca selebihnya akan mudah untuk membuat programnya, baiklah silahkan di ikuti tutorialnya sebagai berikut :
Download File Project Button Led STM32 | DOWNLOAD
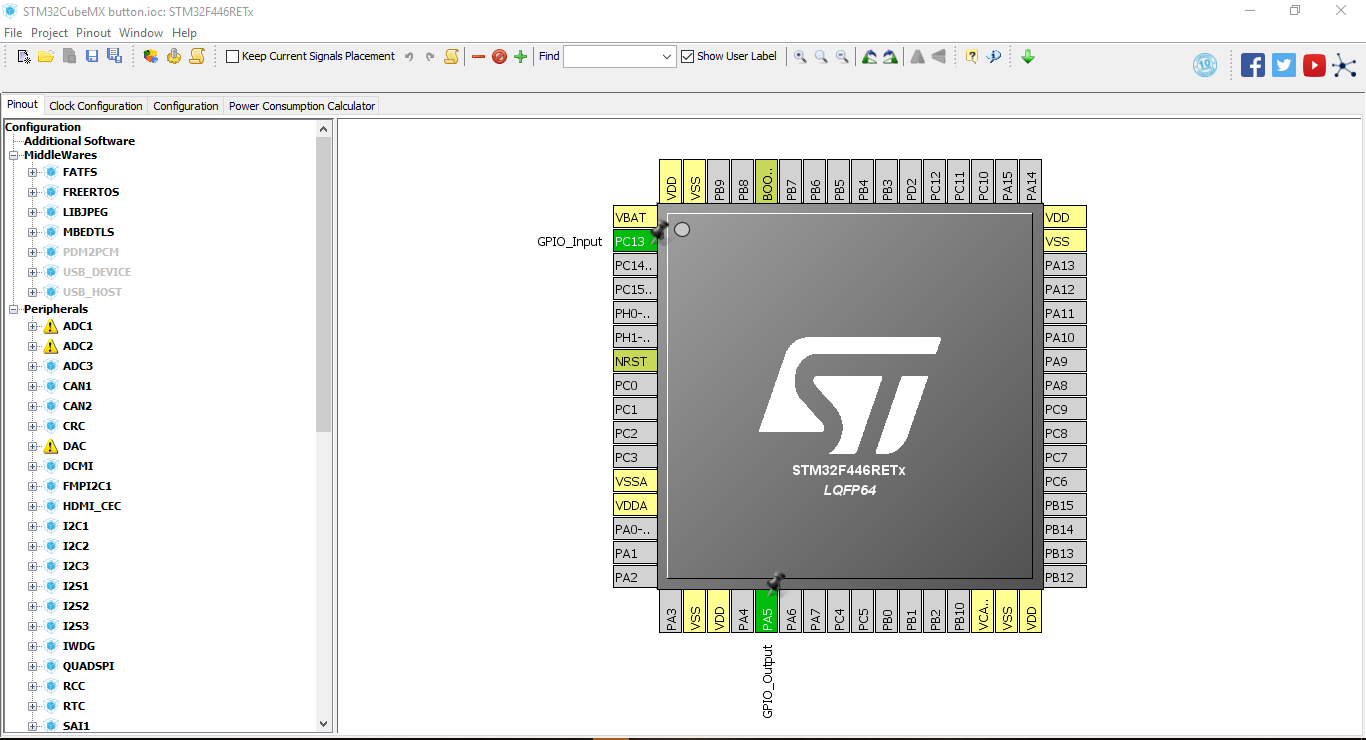
1. buka Software STM32Cube nya, kemudian New Project dan pilih tipe Board STM32 kamu, disini saya menggunakan STM32F446RE Nucleo,
atau kamu bisa copy paste semua program dibawah ini.

/**
******************************************************************************
* @file : main.c
* @brief : Main program body
******************************************************************************
** This notice applies to any and all portions of this file
* that are not between comment pairs USER CODE BEGIN and
* USER CODE END. Other portions of this file, whether
* inserted by the user or by software development tools
* are owned by their respective copyright owners.
*
* COPYRIGHT(c) 2018 STMicroelectronics
*
* Redistribution and use in source and binary forms, with or without modification,
* are permitted provided that the following conditions are met:
* 1. Redistributions of source code must retain the above copyright notice,
* this list of conditions and the following disclaimer.
* 2. Redistributions in binary form must reproduce the above copyright notice,
* this list of conditions and the following disclaimer in the documentation
* and/or other materials provided with the distribution.
* 3. Neither the name of STMicroelectronics nor the names of its contributors
* may be used to endorse or promote products derived from this software
* without specific prior written permission.
*
* THIS SOFTWARE IS PROVIDED BY THE COPYRIGHT HOLDERS AND CONTRIBUTORS “AS IS”
* AND ANY EXPRESS OR IMPLIED WARRANTIES, INCLUDING, BUT NOT LIMITED TO, THE
* IMPLIED WARRANTIES OF MERCHANTABILITY AND FITNESS FOR A PARTICULAR PURPOSE ARE
* DISCLAIMED. IN NO EVENT SHALL THE COPYRIGHT HOLDER OR CONTRIBUTORS BE LIABLE
* FOR ANY DIRECT, INDIRECT, INCIDENTAL, SPECIAL, EXEMPLARY, OR CONSEQUENTIAL
* DAMAGES (INCLUDING, BUT NOT LIMITED TO, PROCUREMENT OF SUBSTITUTE GOODS OR
* SERVICES; LOSS OF USE, DATA, OR PROFITS; OR BUSINESS INTERRUPTION) HOWEVER
* CAUSED AND ON ANY THEORY OF LIABILITY, WHETHER IN CONTRACT, STRICT LIABILITY,
* OR TORT (INCLUDING NEGLIGENCE OR OTHERWISE) ARISING IN ANY WAY OUT OF THE USE
* OF THIS SOFTWARE, EVEN IF ADVISED OF THE POSSIBILITY OF SUCH DAMAGE.
*
******************************************************************************
*/
/* Includes ——————————————————————*/
#include “main.h”
#include “stm32f4xx_hal.h”
/* USER CODE BEGIN Includes */
/* USER CODE END Includes */
/* Private variables ———————————————————*/
/* USER CODE BEGIN PV */
/* Private variables ———————————————————*/
/* USER CODE END PV */
/* Private function prototypes ———————————————–*/
void SystemClock_Config(void);
static void MX_GPIO_Init(void);
/* USER CODE BEGIN PFP */
/* Private function prototypes ———————————————–*/
/* USER CODE END PFP */
/* USER CODE BEGIN 0 */
uint8_t count;
/* USER CODE END 0 */
/**
* @brief The application entry point.
*
* @retval None
*/
int main(void)
{
/* USER CODE BEGIN 1 */
/* USER CODE END 1 */
/* MCU Configuration———————————————————-*/
/* Reset of all peripherals, Initializes the Flash interface and the Systick. */
HAL_Init();
/* USER CODE BEGIN Init */
/* USER CODE END Init */
/* Configure the system clock */
SystemClock_Config();
/* USER CODE BEGIN SysInit */
/* USER CODE END SysInit */
/* Initialize all configured peripherals */
MX_GPIO_Init();
/* USER CODE BEGIN 2 */
/* USER CODE END 2 */
/* Infinite loop */
/* USER CODE BEGIN WHILE */
while (1)
{
/* USER CODE END WHILE */
/* USER CODE BEGIN 3 */
if (HAL_GPIO_ReadPin(GPIOC, GPIO_PIN_13) == GPIO_PIN_RESET){
while (HAL_GPIO_ReadPin(GPIOC, GPIO_PIN_13) == GPIO_PIN_RESET){}
count = !count;
}
if (count == 1){
HAL_GPIO_WritePin (GPIOA, GPIO_PIN_5, GPIO_PIN_SET);
} else if (count == 0){
HAL_GPIO_WritePin (GPIOA, GPIO_PIN_5, GPIO_PIN_RESET);
}
}
/* USER CODE END 3 */
}
/**
* @brief System Clock Configuration
* @retval None
*/
void SystemClock_Config(void)
{
RCC_OscInitTypeDef RCC_OscInitStruct;
RCC_ClkInitTypeDef RCC_ClkInitStruct;
/**Configure the main internal regulator output voltage
*/
__HAL_RCC_PWR_CLK_ENABLE();
__HAL_PWR_VOLTAGESCALING_CONFIG(PWR_REGULATOR_VOLTAGE_SCALE3);
/**Initializes the CPU, AHB and APB busses clocks
*/
RCC_OscInitStruct.OscillatorType = RCC_OSCILLATORTYPE_HSI;
RCC_OscInitStruct.HSIState = RCC_HSI_ON;
RCC_OscInitStruct.HSICalibrationValue = 16;
RCC_OscInitStruct.PLL.PLLState = RCC_PLL_NONE;
if (HAL_RCC_OscConfig(&RCC_OscInitStruct) != HAL_OK)
{
_Error_Handler(__FILE__, __LINE__);
}
/**Initializes the CPU, AHB and APB busses clocks
*/
RCC_ClkInitStruct.ClockType = RCC_CLOCKTYPE_HCLK|RCC_CLOCKTYPE_SYSCLK
|RCC_CLOCKTYPE_PCLK1|RCC_CLOCKTYPE_PCLK2;
RCC_ClkInitStruct.SYSCLKSource = RCC_SYSCLKSOURCE_HSI;
RCC_ClkInitStruct.AHBCLKDivider = RCC_SYSCLK_DIV1;
RCC_ClkInitStruct.APB1CLKDivider = RCC_HCLK_DIV1;
RCC_ClkInitStruct.APB2CLKDivider = RCC_HCLK_DIV1;
if (HAL_RCC_ClockConfig(&RCC_ClkInitStruct, FLASH_LATENCY_0) != HAL_OK)
{
_Error_Handler(__FILE__, __LINE__);
}
/**Configure the Systick interrupt time
*/
HAL_SYSTICK_Config(HAL_RCC_GetHCLKFreq()/1000);
/**Configure the Systick
*/
HAL_SYSTICK_CLKSourceConfig(SYSTICK_CLKSOURCE_HCLK);
/* SysTick_IRQn interrupt configuration */
HAL_NVIC_SetPriority(SysTick_IRQn, 0, 0);
}
/** Configure pins as
* Analog
* Input
* Output
* EVENT_OUT
* EXTI
*/
static void MX_GPIO_Init(void)
{
GPIO_InitTypeDef GPIO_InitStruct;
/* GPIO Ports Clock Enable */
__HAL_RCC_GPIOC_CLK_ENABLE();
__HAL_RCC_GPIOA_CLK_ENABLE();
/*Configure GPIO pin Output Level */
HAL_GPIO_WritePin(GPIOA, GPIO_PIN_5, GPIO_PIN_RESET);
/*Configure GPIO pin : PC13 */
GPIO_InitStruct.Pin = GPIO_PIN_13;
GPIO_InitStruct.Mode = GPIO_MODE_INPUT;
GPIO_InitStruct.Pull = GPIO_PULLUP;
HAL_GPIO_Init(GPIOC, &GPIO_InitStruct);
/*Configure GPIO pin : PA5 */
GPIO_InitStruct.Pin = GPIO_PIN_5;
GPIO_InitStruct.Mode = GPIO_MODE_OUTPUT_PP;
GPIO_InitStruct.Pull = GPIO_NOPULL;
GPIO_InitStruct.Speed = GPIO_SPEED_FREQ_LOW;
HAL_GPIO_Init(GPIOA, &GPIO_InitStruct);
}
/* USER CODE BEGIN 4 */
/* USER CODE END 4 */
/**
* @brief This function is executed in case of error occurrence.
* @param file: The file name as string.
* @param line: The line in file as a number.
* @retval None
*/
void _Error_Handler(char *file, int line)
{
/* USER CODE BEGIN Error_Handler_Debug */
/* User can add his own implementation to report the HAL error return state */
while(1)
{
}
/* USER CODE END Error_Handler_Debug */
}
#ifdef USE_FULL_ASSERT
/**
* @brief Reports the name of the source file and the source line number
* where the assert_param error has occurred.
* @param file: pointer to the source file name
* @param line: assert_param error line source number
* @retval None
*/
void assert_failed(uint8_t* file, uint32_t line)
{
/* USER CODE BEGIN 6 */
/* User can add his own implementation to report the file name and line number,
tex: printf(“Wrong parameters value: file %s on line %drn”, file, line) */
/* USER CODE END 6 */
}
#endif /* USE_FULL_ASSERT */
/**
* @}
*/
/**
* @}
*/
/************************ (C) COPYRIGHT STMicroelectronics *****END OF FILE****/